
Cyrodiil AvA Tactics: The Basics
Elder Scrolls Online will expose many players to forms of combat that have, in the past, been more appropriate with real life situations than in a mmo. Real life combat tactics will actually come into play for many people who have never had the need or desire to learn them in this MMO. One such tactic is the ambush.
Ambushes
Tactical ambushes will be effective and will most likely see widespread execution across the Cyrodiil landscape. In fact, the landscape of Cyrodiil lends itself to this type of combat quite well. The terrain is varied, with many places for opposing teams to hide in wait for their opponents. These potential sites provide cover and concealment as well as concentrated fire zones. A well-executed ambush is not only devastating to your opponent’s morale, but their numbers as well. An ambush should be planned well in advance and is not something that just happens. For it to be effective it must meet several criteria.
- The enemy must be put in a position that funnels them into a narrow “killing zone”. This killing zone is one in which the enemy has few options for escape. It limits their response, and allows a rapid escape for the “good guys.”
- There should be a crossfire that puts a maximum amount of damage into a narrow focused area in order to put your enemy down as quickly as possible. It restricts their escape, and prevents them from making a counterattack.
- A good ambush allows for maximum cover and concealment to minimize the chance of damage to your own team.
- Advance planning will enable the field commander to know where the enemy access points are. Where do they travel, when are they likely to travel, etc.
- An ambush that occurs after dark is especially disorienting to the victims as their vision is limited, and makes counterattacking difficult if not impossible.
- Placing your team on high ground also makes it more difficult for the opposing team to reach your team in an attempt to flee the killing zone.
- Even the best plans sometimes go astray for any number of reasons. Plan an escape route for your team if something goes wrong. Better to run away and fight again, than to lay is some field eating dirt!
Here are some examples to illustrate what to look for when setting up your ambush points.
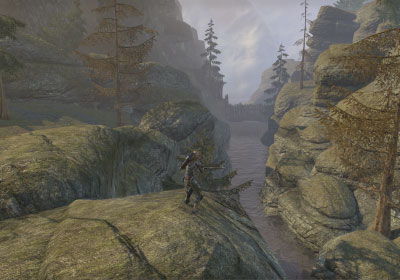
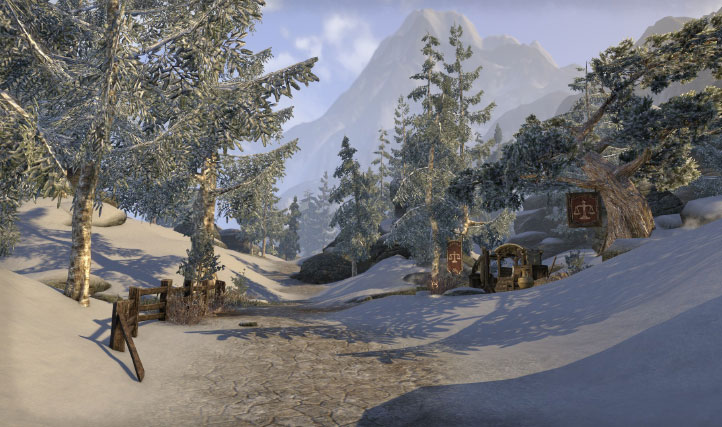
Figure 1 Potential Ambush Site
This site illustrates several of the points we have been discussing. This site allows the attackers a height advantage over their enemy. It provides almost no access to the enemy to rush their attackers, and provides both cover and concealment for the attacking force. Additionally this site provides an additional advantage to the attacking force: The water in the valley slows the enemy and keeps them in the “killing zone” for an extended time frame. If the gate in the distance is controlled by your team it would be even better for you could close the gate behind the enemy when you spring your ambush, allowing them only one avenue of escape. Unfortunately this site would not work, for the gate in the distance goes nowhere, but it is a good example to illustrate the ideal.
Cyrodiil is a large battleground that takes over 30 minutes to run across from border to border. As a commander who is seeking potential ambush sites you should be using your map to locate potential sites in order to save you a lot of time randomly exploring the landscape. The illustration below shows one such potential site that I identified using the map.
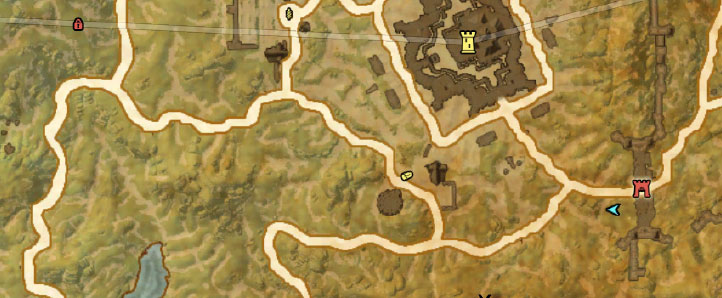
Figure 2 Map Use to Scout Potential Ambush Site
This illustration taken from Cyrodiil shows a promising ambush site location. The trail between the two “X’s” is our potential site. It provides a limited access through mountainous terrain. It parallels a well-traveled road that leads both to a Keep and a Gate. It also leads to a town that provides quests to all factions, which is also an advantage. In order for you as a commander to know if this potential site will really work out as an ambush site, you will need to perform an actual in-person field recon of the area. The map provides us some information, but not enough to make an informed decision.
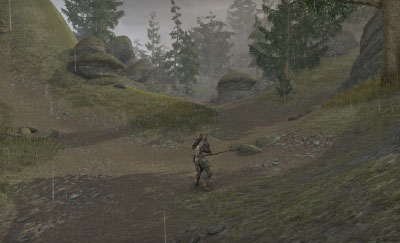
Figure 3 Entrance to the potential site from the South
When I first came up on the area from the south I was immediately encouraged by what I saw. Steep sides, with a narrow path up the center just as the map seemed to indicate. There is plenty of potential cover and concealment among the rock formations on either side. The pathway in real life would show the path is well traveled. Unfortunately we cannot confirm this in the game. We will have to scout this location during peak periods of combat to see if the path is used by actual players. What I would be looking for as I progressed up this trail was potential hiding places that provides cover and concealment for my team, and limits to the response routes for the enemy team.
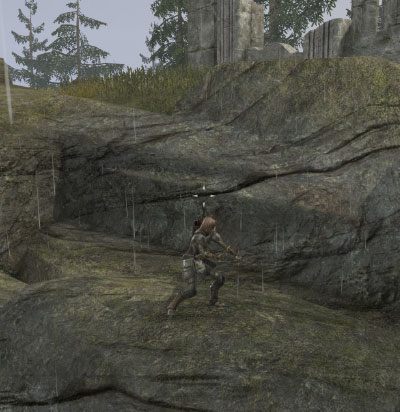
Figure 4 Limited access to upper level prevent direct frontal melee attacks
Figure 4 shows how the terrain in this site limits access to the ambushing squad. Here I am standing in an area that potential melee counter attackers could access in a relatively short time frame. Unfortunately for them, they cannot get any higher. I confirmed this with my site recon. Ambushers on the level above can rain ranged attacks on them without fear of melee response. The actual ambush site is farther below which keeps the enemy in the killing zone even longer, since access to this point is not an easy task as you can see in the next screenshot. So make sure when you are scouting to try and access the areas your team will be stationed in from the killing zone from several directions to make sure your team will be secure.
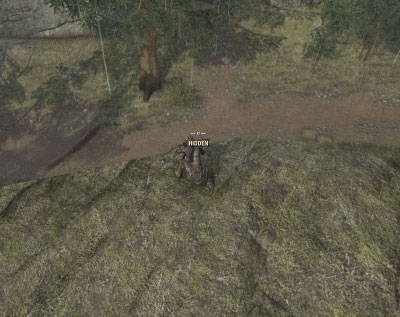
Figure 5 shows the actual killing zone of this ambush site.
Figure 5 is a view of the actual killing zone of the ambush. I am shown standing on the same rock as in figure 4. You can see that there is little access to the ambushers. On the other side of the trail similar protection is offered to team members who would be stationed there.
The site is not perfect, for the perfect ambush site is so far still a dream. The figure below illustrates one minor problem area.
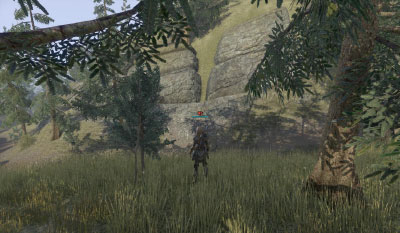
Figure 6 Potential counterattack avenue of approach
Here you can see a potential avenue for the opponent to scramble up the slope towards our attackers. The path directly over my head is the avenue of approach. You will notice it is a fairly narrow access point. By concentrating fire on this point with a few people you should be able to take down anyone attempting this route quite easily. AOE traps, etc. would be great placed in this area.
In real life the steepness of the terrain here would also hamper the opponent’s access to the attacking team, but this is not something that has been implemented by the designers.
Our escape route for this site would be to the north past the ruins near the top of the ambush site towards the gate shown in red on the map. Access is readily available to both sides of the ambush towards the gate.
So it would seem this is indeed a good site to establish an ambush. We would certainly want to scout this area to make sure it is actually being used by our opponents as I mentioned previously, but I think you can see what we are looking for when selecting the site. This site shows great potential and went into my notebook for future reference/use.
If we decided to utilize this as an actual ambush site we would want to have between 10-15 people on each side of the path with ranged weapons. We would station two people at the beginning and end of the killing zone. Once the ambush is sprung we would want to drop ballista at the start of the trail and end of the trail to take care of any who try to escape using those routes (See accompanying screenshots for several possible placements). The second person at the trails ends would be for protection of the siege operators. In real life we would have used claymore anti-personnel mines to protect these ends, but since they aren’t available in Cyrodiil we will have to make do.
Good communication with your team members is also vital. Make sure each and every member of your ambush team knows what their position is, what their job is, what the signal to initiate the ambush is, and what the signal to (escape or “boogie out of dodge is.”) Never assume they know for it never fails, someone will go “I didn’t know.”
Another thing that is vitally important in an ambush site is discipline at the site. Everyone must stay hidden in a crouching position so as not to give away the ambush site prematurely. The last thing you want to happen is to give away your element of surprise. The waiting game in an ambush is tough. It separates a good team from a bad team. The good team is patient, and disciplined. They look forward to catching their enemy by surprise. The element of surprise is vital for a successful ambush as the enemy freezes momentarily right where you want them, in the “killing zone” at the moment the ambush is sprung. This is human nature, the brain “farts” for lack of a better word when faced with a surprise. The longer they stay there confused and dazed, in the KZ, the better for your team and the worse for them. It allows your concentrated fire to have more effect, and it allows you to set up siege at the entrance and exit of the ambush site increasing the chance for total victory and devastation of your opponent.
When stationing yourself in a potential ambush site you should also make use of good cover and concealment. Good cover provides both concealment and cover, but good concealment does not necessarily provide good cover.
Here are two examples to illustrate this point.
Figure 7 Great example of Concealment
In Figure 7 I am effectively concealed from my opponents view. It would take a keen eye to spot my character unless you knew where I was. Another example of concealment not illustrated is to simply crouch in position. Your enemy cannot see you when you are crouched.
There is a problem with good concealment though, it provides no protection from enemy fire. You are completely vulnerable to enemy fire even though you might not be seen. Arrows penetrate leaves quite easily.
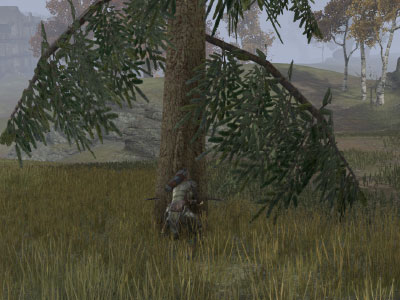
Figure 8 Example of good Cover
Figure 8 illustrates the concept of cover. Unfortunately I had to take this screen shot from the rear as I was unable to get a good shot from the front due to my proximity to the tree. This is the same tree as shown in figure 7. Cover protects you from enemy fire, and often time protects you from enemy view as well. The only thing that appears from the front view of this tree is the ends of my bow, which for all intents appear as small branches.
I mentioned placement of siege engines in the ambush site earlier. Here are several examples of potential siege placements at the ambush site.
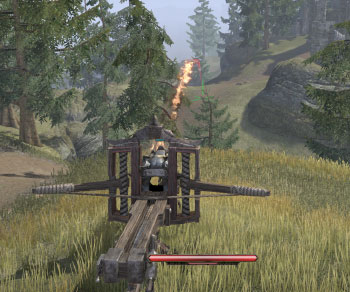
Figure 9 Ambush Exit Ballista Placement Example
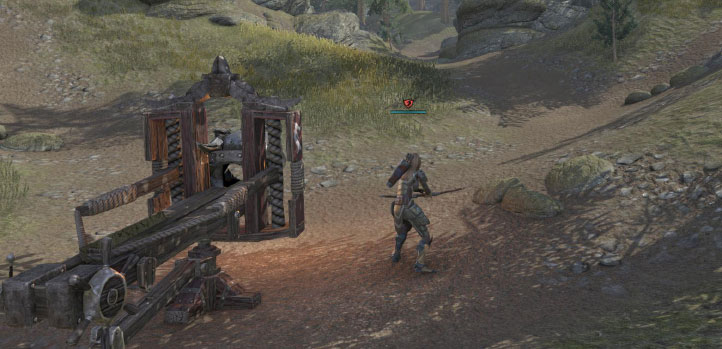
Figure 10 Ambush Entrance Placement Example
Siege placement could also include “meat bag” catapults to poison your enemies in the killing zone.
Ok, so you have now planned, scouted, and set up your ambush. You wait for your opponent to show up, and spring the ambush. But suddenly something goes wrong and the enemy is escaping your ambush. Don’t wait for them to regroup, give the signal to withdraw and have your team leave the area as quickly as possible via your escape route. Waiting around can get you all killed and negate any gains you made.
Knowing how to plan, scout, set-up, and execute an effective ambush are skills every commander should be intimately familiar with. Not only to ensure the destruction of the enemy, but to be able to know what terrain features on the map to avoid. If you know where to set one up, you will also know what areas to avoid!
If you do get caught in an ambush the main thing you have to do is to “get out of the killing zone” ASAP! If you stay in the KZ you will die, can’t put it any simpler. Marines are taught to turn and advance towards the attackers as quickly as possible if caught in an ambush, but avoidance is a far better option. It doesn’t matter which direction, just get your feet moving as quickly as possible towards your attackers. You might make them duck, or move which might just give you enough time to get them.
Pay attention to the terrain, know what potential sites look like, and take steps to avoid those areas. Now that you know what to look for you should not have any problems. If you do get caught in a well laid out and executed ambush, shame, shame, shame.
About Elder Scrolls Online
Experience an ever-expanding story across all of Tamriel in The Elder Scrolls Online, an award-winning online RPG. Explore a rich, living world with friends or embark upon a solo adventure. Enjoy complete control over how your character looks and plays, from the weapons you wield to the skills you learn – the choices you make will shape your destiny. Welcome to a world without limits.